Chicken Pakoda – The Ultimate Evening Snack Favorite!
Chicken Pakoda Recipe – Easy Homemade Method
Chicken Pakoda – The Ultimate Evening Snack Favorite!
When we think about evening snacks, the first few items that come to mind are vada, pakoda, samosa, chips and many more. Among these popular snacks, one item that always stands out and wins everyone’s heart is Chicken Pakoda. Most of us have tasted it from restaurants, but nothing can beat the fresh, homemade flavour of Chicken Pakoda.
Today, let’s see how to make this crispy, tasty, flavour-packed Chicken Pakoda right at home. The best part is – you only need a few simple ingredients and a quick marination. That’s it! You can prepare it in no time.
Whenever guests arrive suddenly and you don’t know what to serve, don’t worry. If you have chicken and a few basic spices at home, that’s more than enough. Mix everything together, marinate the chicken and fry it on medium heat…
You will get a Chicken Pakoda that tastes better than hotel style!
Enjoy it with a cup of hot tea or coffee – it tastes even more delightful. The inside stays soft and juicy, while the outside turns perfectly crispy. Kids to adults – everyone will absolutely love it. They will keep asking, “Wow! This is so tasty! What pakoda is this?” and will surely appreciate your cooking.
Alright, let’s jump in and see how to make this super delicious Chicken Pakoda easily at home.
Preparation Time
1 Hour
Serve
2–3 Persons
Ingredients:
- Chicken pieces – 250–300 g
- Masala to Grind:
- Cinnamon – 2 small pieces
- Cardamom – 2
- Cloves – 2
- Garlic – 3 cloves
- Ginger – small piece
- Dry red chilli – 3
- Bay leaf – 1
- Tamarind – 10 g
- Green chilli – 1
- Curry leaves – 2 sprigs
- Coriander seeds – 1 tsp
- ➡️ Add all these ingredients with a little water and grind into a thick paste.
- For Marination:
- Kasuri methi – 1/2 tsp
- Ginger garlic paste – 1 tsp
- Salt – 1/2 tsp
- Lemon juice – from half a lemon
- Corn flour – 2 tsp
- Maida (all-purpose flour) – 1 tsp
- For Frying:
- Oil – 1/4 liter
Required Cooking Equipments:
- Mixer jar – for grinding masala
- Kadai – for frying
- Mixing bowl – for marination
- Slotted spoon – to remove fried chicken
- Plate with tissue paper – to drain excess oil
Cooking Instruction :
- Masala Paste
- Add all the ingredients listed under Masala to Grind into a mixer with a little water and grind into a thick paste.
- Marination
- In a mixing bowl:
- Add the ground masala paste, Kasuri methi, Ginger garlic paste, Salt, Lemon juice, Corn flour, Maida, Mix everything well.
- Add the chicken pieces and coat them thoroughly.
- Let it rest for 30 minutes.
- Frying
- Heat oil in a kadai.
- On medium heat, add the marinated chicken pieces.
- Fry till they turn golden brown and crispy.
- Remove and place on tissue paper to drain oil.
Serving Method:
- Serve hot.
- Onion rings + lemon wedges + mint chutney will enhance the taste even more!
Cooking Tips :
- Cut the chicken into small pieces for extra crispiness inside and outside.
- Don’t overheat the oil; medium heat gives the perfect texture.
- Adding a little extra corn flour gives a crispier finish.
- Increase green chillies if you want it spicier.
Chicken Pakoda is one of the easiest and tastiest evening snacks you can prepare at home. With just a handful of ingredients and a quick marination, you can make a crispy, juicy and flavourful snack that everyone will love. Whether it’s for guests, tea-time cravings, or a weekend treat, this homemade Chicken Pakoda never fails to impress. Try it once, and it will definitely become your family’s favourite go-to snack!
Search......

Cook's Signal
"Vannakkam! Cooking Signal was born from my love for cooking and for sharing Recipe with family and friends. My goal is to inspire and empower you to cook with confidence and to enjoy quality time with your loved ones."
You Must Read
-
 Chicken Pakoda Recipe – Easy Homemade Method
 -
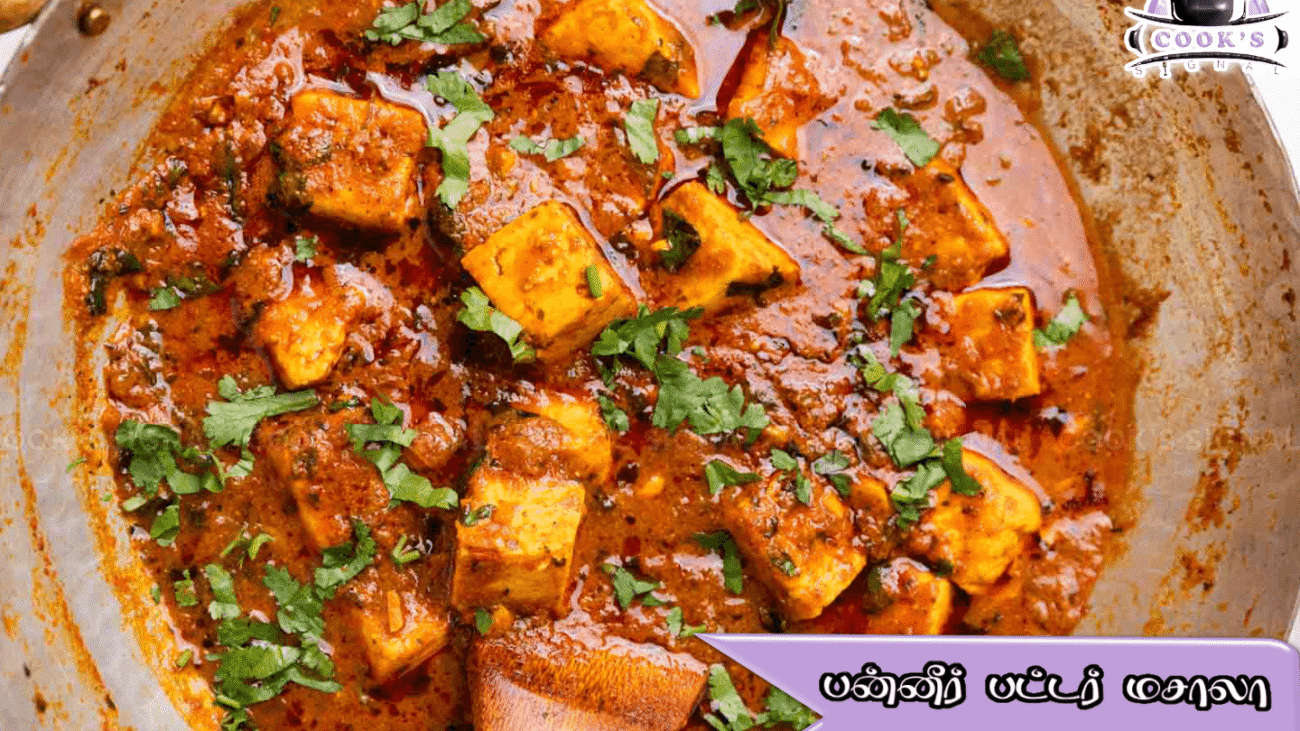
Paneer Butter Masala – Creamy & Rich Gravy Recipe (Step-by-Step Guide)
-
வறுத்த முட்டை தொக்கு ரெசிபி
-
மென்மையான ஃபட்ஜி பிரவுனி | வீட்டில் சுலபமாக செய்யும் சாக்லேட் கேக் ரெசிபி
-
முட்டை பிரியாணி செய்முறை | சுலபமான Egg Biryani Recipe in Tamil
-
தென்னிந்திய சாம்பார் ரெசிபி, உண்மையான தமிழ் ஸ்டைல் சாம்பார்
-
"Soft Goat Brain Pepper Roast | Spicy Masala Brain Fry Recipe"
-
டோஃபு காரட் வெள்ளை குருமா
-
Tofu Carrot White Kurma
-
How to Make Rasam Powder

 2")


Must Visit Recipes
Recent Post
-
Chicken Pakoda Recipe – Easy Homemade Method
-
சிக்கன் பகோடா ரெசிபி – வீட்டிலேயே எளிதாக செய்யும் முறை
-
Paneer Butter Masala – Creamy & Rich Gravy Recipe (Step-by-Step Guide)
-
அசத்தல் சுவையில் பன்னீர் பட்டர் மசாலா மதிய லன்ச்கு இப்பிடி ஒரு தடவ செய்து பாருங்க
-
"Squid Tawa Fry Recipe | Beach-Style Taste Made Easy at Home in 25 Minutes!"
-
"கணவா மீன் தவா வறுவல் | கடற்கரையில் சாப்பிடும் ருசியில் வீட்டிலேயே செய்முறை!"
-
"சூப்பரான ஸ்பைஸி பன்னீர் 65 – ஹைதராபாத் ஸ்டைல் சைடு டிஷ் உங்கள் வீட்டுக்கு!"
-
Spicy and Super Tasty Paneer 65 – Hyderabadi Style Side Dish for Your Home!


 செய்வது எப்படி 9")