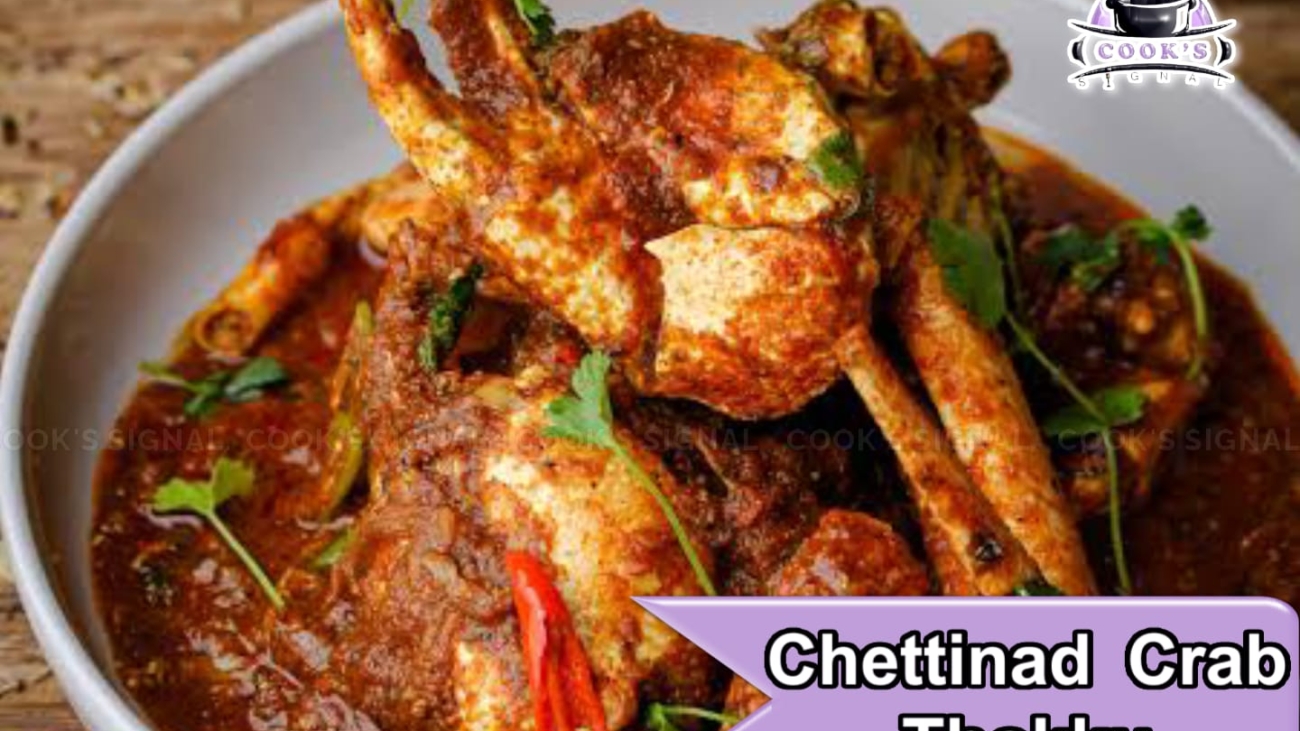
afghani omelette recipe

A Taste of Afghanistan: Mastering the Savory Afghani Omelette (Khagina)

Afghani Omelette:

Have you ever craved a breakfast that’s both hearty and flavorful, a dish that transcends the ordinary omelette? Look no further than the Afghani Omelette, or Khagina. This savory delight, originating from the heart of Afghanistan, is a culinary masterpiece that combines simple ingredients into a symphony of taste.

What is Khagina?

Khagina, also known as Toshak in some regions, is a traditional Afghani omelette that’s far from your typical morning fare. It’s characterized by its rich, savory flavor profile, often incorporating vegetables like tomatoes, onions, and scallions, along with spices that bring warmth and depth.

Why You’ll Love It:

Flavorful and Hearty: Unlike a plain omelette, Khagina is packed with vegetables and spices, making it a satisfying meal.

Easy to Make: With simple ingredients and straightforward steps, you can whip up this dish in no time.

Versatile: Khagina can be enjoyed for breakfast, lunch, or even dinner.

Cultural Experience: Cooking Khagina allows you to experience a taste of Afghan cuisine and culture.

Preparation Time

35 Minutes

Serve

3-4 person

Ingredients:

Required Cooking Equipments

Cooking Instruction :

Serving Method

Cooking Tips

pepper chicken recipe

Spicy Pepper Chicken: A Delicious Flavor Burst!

Pepper Chicken:

Who doesn’t love Pepper Chicken? This spicy dish is a flavorful treat that everyone will enjoy. This recipe is simple and can be made with ingredients found in your home.

Pepper Chicken Speciality:

Pepper’s Pungency: The main attraction is the pepper’s spiciness. It gives the dish a unique flavor. Pepper is good for digestion and boosts immunity.

Easy Preparation: Pepper chicken is very easy to make. Minimal ingredients and a short cooking time are required.

Versatility: Pepper chicken can be cooked in various ways. You can make it as a fry, gravy, or curry, according to your preference.

Healthy Dish: Pepper chicken is a protein-rich, healthy dish. Pepper and other spices are beneficial for the body.

Preparation Time

45-55 Minutes

Serve

3-4 person

Ingredients:

Required Cooking Equipments

Cooking Instruction :

Serving Method

Cooking Tips

paal paniyaram recipe in tamil

Paal Paniyaram: The Taste of Our Traditional Sweet!

Paal Paniyaram: The Taste of Our Traditional Sweet!

Paal Paniyaram is a very famous traditional sweet in South India. It’s a fantastic dish made with urad dal and rice. Though it looks like small balls, it’s very special in taste.

Paal Paniyaram is a unique sweet, made during festival times and special occasions. When made in the traditional method, its taste takes us to another world.

This sweet is made by soaking urad dal and rice, grinding them, frying small balls in oil, and soaking them in coconut milk. This paniyaram, soaked in coconut milk, gives a soft and sweet taste.

Making Paal Paniyaram is an art. Soaking urad dal and rice in the right ratio, grinding them, and frying them to the correct consistency are very important. Making coconut milk and adding the right amount of sugar determines its taste.

This Paal Paniyaram is especially loved by everyone from kids to adults. Its soft texture and sweet taste attract everyone.

Paal Paniyaram is a part of our tradition. It plays a main role in our family functions and festivals. By making this sweet, we can carry our tradition to the next generation.

Preparation Time

50 Minutes

Serve

3-4 person

Ingredients:

Required Cooking Equipments

Cooking Instruction :

Serving Method

Cooking Tips

aatukal paya recipe

Aattukaal paya recipe how to make restaurant style Aatukaal Paya

Delicious Goat Leg Curry Recipe – A Flavorful and Hearty Dish

Goat leg curry is a rich and aromatic dish that is perfect for special occasions or a hearty weekend meal. With the right blend of spices, tender meat, and fresh herbs, this dish is sure to impress your family and guests. In this blog, we’ll guide you through a simple yet flavorful recipe using fresh ingredients and traditional spices.

Mutton Paya

Mutton Paya is a delicious curry that pairs wonderfully with parotta, idiyappam, and rice. To prepare it, the mutton legs are first thoroughly cleaned, ground spices are added, sautéed well, and then cooked on a medium flame with water. The flavor is rich, with a thick gravy due to the blended spices. The addition of spices like garlic, pepper, fennel, and cloves makes it flavorful and helps balance body heat. Served hot, it’s a truly authentic delicacy!

Traditional Dish – Mutton Paya holds an important place in South Indian cuisine. It’s a majestic dish enjoyed with parotta, idiyappam, or rice.

Flavor and Aroma – The addition of spices like pepper, garlic, fennel, and cloves gives Paya a unique aroma and intense flavor.

Comforting Food – It’s considered a medicinal food, especially during winter or when one is suffering from fever or weakness.

Balances Body Heat – Ingredients like pepper and garlic in Paya have properties that help balance body heat, providing excellent immune support.

Strengthens Bones – The fat and bone marrow in mutton legs are excellent sources of fat and protein, providing essential calcium and nutrients for bones.

Excellent Soup – The yellowish, slightly thick soup of Mutton Paya is its highlight, offering a smooth, soothing experience when sipped.

Good for the Stomach – Its warmth and spices enhance digestion, reducing intestinal issues and gas problems.

Satisfying Meal – This dish is cooked for an extended period, making it a fulfilling meal when served with parotta.

Best in Winter – Consuming Paya in the morning during winter keeps the body warm and boosts immunity.

Historically Popular in Royal Households – Considered a grand dish since the times of kings and landlords, it was a favorite in many palaces.

Preparation Time

35 Minutes

Serve

4 person

Ingredients:

Required Cooking Equipments

Cooking Instruction :

Serving Method

Cooking Tips

Kothamalli chutney in tamil

Coriander Chutney – Kothamalli Chutney Recipe Topnotch Taste Try This Way!

Coriander Chutney:

Coriander is usually used in small amounts for garnishing sambar and rasam. But do you know how beneficial it is when you make a full chutney out of it instead of just adding a few leaves while cooking?


Today, we’re going to prepare a delicious coriander chutney that can be made even if you don’t have onions or tomatoes at home. This chutney is absolutely amazing and pairs perfectly with idli, dosa, chapati, and poori. It has a tangy, spicy, and unique taste that makes it a delightful side dish. Once you try it, every time you see onions and tomatoes, this chutney will come to your mind!

If you’re bored of eating the same chutney and sambar every day with idli and dosa, try this variation. Even those who are tired of eating idli and dosa daily will love it when paired with this chutney. Serve this at home, and everyone will enjoy it so much that they’ll ask for extra idlis!


Don’t just imagine the taste—try making it once, and you’ll keep making it again and again. It’s so simple yet flavorful that you’ll even prepare it when guests come over! The best part? You only need a few ingredients to make this incredibly delicious chutney.


Now, let’s see how to make this flavorful coriander chutney in a simple yet tasty way.

What makes this chutney special?

✔ No coconut or lentils, yet full of taste!

✔ Fresh green color with an amazing aroma!

✔ Pairs well with idli, dosa, chapati, and even curd rice!

✔ Add mint for an even richer flavor!


🔥 Try mint-coriander chutney for a next-level taste!

🔥 Add tomatoes for a new variation!

🔥 Garlic makes it extra flavorful!


Now, let’s move on to the recipe!

Preparation Time

35 Minutes

Serve

4 person

Ingredients:

Required Cooking Equipments

Cooking Instruction :

Serving Method

Cooking Tips

briyani kathirikai thokku

Kathirikkai Thokku Recipe – Quick Biriyani Thokku Recipe

Brinjal Thokku – The Ultimate Biryani Side Dish!

If you’ve ever had “mess-style” biryani, you know they always serve a special brinjal thokku on the side. The taste? Absolutely next level! This dish pairs so well with biryani that you’ll end up eating two extra plates without even realizing it! Not just for biryani, it’s also great with plain rice, chapati, or dosa. You’ve got to try this!

Preparation Time

35 Minutes

Serve

4 person

Ingredients:

Required Cooking Equipments

Cooking Instruction :

Serving Method

Cooking Tips

manathakkali vaththa kulampu in tamil

Manathakkali Vaththal Kulampu Recipe at Home

Manathakkali Vathal Kuzhambu:

Try This Once – You Won’t Have Any Leftovers!

Hello, friends!

Today, I’m excited to share the recipe for a traditional South Indian delicacy – Manathakkali Vathal Kuzhambu. This dish is not just delicious but also packed with health benefits.

What’s Special About Manathakkali Vathal Kuzhambu?

This is a classic South Indian dish that balances tangy, spicy, and slightly sweet flavors.

Manathakkali vathal (dried black nightshade berries) has medicinal properties and is known for soothing stomach ulcers.

This kuzhambu pairs well with rice, idli, dosa, and other South Indian staples.

Health Benefits of Manathakkali Vathal

Helps in treating stomach ulcers.

Aids digestion and improves gut health.

Has anti-inflammatory properties.

Preparation Time

45 Minutes

Serve

4-5 person

Ingredients:

Required Cooking Equipments

Cooking Instruction :

Serving Method

Cooking Tips

thengkai paal rasam recipe

Pollachi Special Coconut Milk Rasam: A Delightful Blend of Flavor and Health

Pollachi Special Coconut Milk Rasam: A Delightful Blend of Flavor and Health

Pollachi’s culinary heritage boasts a unique treasure: Coconut Milk Rasam. This isn’t just any rasam; it’s a soothing and flavorful dish packed with health benefits.

Excellent for digestion.

Soothes stomach ulcers.

Beneficial for those with acidity.

Uniquely flavorful.

Preparation Time

30 Minutes

Serve

4 person

Ingredients:

Required Cooking Equipments

Cooking Instruction :

Serving Method

Cooking Tips

lal chicken recipe

Lal Chicken ❤️to impress your crush! Easy Spicy LAL CHICKEN RECIPE��

Laal Chicken

If bachelors want to make something easy and tasty, they can try this Laal Chicken. This chicken recipe is a very famous dish in North India. The specialty of this chicken is its spiciness.If you love eating spicy food, you can make and enjoy this fiery Laal Chicken at home. The Kashmiri chili powder used in this dish gives it a vibrant color and an amazing taste that catches the eye. Just looking at this dish will make you crave it instantly.Before eating any food, its color and aroma tempt us—and this dish has both in the perfect amount. Whether you make it for your family or friends, they will be amazed by the taste. You can enjoy this with idli, dosa, chapati, or rice—it will be absolutely delicious!

Now, let’s see how to make it!

Preparation Time

45 Minutes

Serve

4 person

Ingredients:

Required Cooking Equipments

Cooking Instruction :

Serving Method

Cooking Tips

poondu idli podi recipe in tamil

Garlic Idli Podi Recipe,How to make it easily

Garlic Idli Podi Recipe

Garlic idli podi is a popular South Indian condiment, a flavorful and aromatic powder that’s a staple in many households.  It’s typically served as an accompaniment to idli, dosa, and other South Indian breakfast dishes, adding a punch of garlicky goodness and enhancing the overall meal.  This versatile powder is not only delicious but also relatively simple to prepare, making it a favorite for busy weeknights or lazy weekends.  The combination of garlic, lentils, and spices creates a unique and irresistible taste that’s both savory and slightly spicy.

This blog post will guide you through a simple and easy-to-follow recipe for making garlic idli podi at home.  Whether you’re a seasoned cook or a beginner in the kitchen, this recipe is designed to be accessible to everyone.  We’ll break down the ingredients and the steps involved, ensuring that you can recreate this authentic South Indian flavor in your own home.

Get ready to tantalize your taste buds with the rich and pungent flavors of homemade garlic idli podi.  Let’s dive into the recipe and discover the secrets to creating this culinary delight.

Preparation Time

20 Minutes

Serve

4 person

Ingredients:

Required Cooking Equipments

Cooking Instruction :

Serving Method

Cooking Tips